


WPalaControl is a Wi-Fi adapter (based on a D1 Mini) to control and monitor stoves using a Fumis controller (Palazzetti, Jotul, Godin, ...).
- 🔥 Power on/off, set point, power level, fans, silent mode, chrono programs, parameters
- 📊 Status, alarms, temperatures, counters, pellet consumption, delta pressure
- 🔌 Native HTTP API compatible with existing Palazzetti/Fumis apps and plugins
- 📡 MQTT with Home Assistant auto-discovery
- ⬆️ Online firmware update from GitHub (also as a Home Assistant Update entity)
- 🔒 Optional password protection of the web interface
- Check that your stove has a Fumis controller
- Plug the module into the stove with the provided cable (or the right one if you built it yourself)
- Connect to the
WPalaControlWi-Fi network (password:password) - In Config, enter your Wi-Fi credentials and save
- Open http://wpalacontrol.local, then configure MQTT / Home Assistant if needed
WPalaControl works with stoves using the Fumis controller, used by many manufacturers:
Palazzetti / Jotul / TurboFonte / Godin / Fonte Flamme / Invicta / Casatelli / Alpis / Faizen / HETA / ...
To check if your stove is compatible, look for one of these control panels or motherboards:


| Integration | Preview | |
|---|---|---|
 |
MQTT Integration (auto-discovery) Most options and fan controls |
 |
|
Palazzetti Integration (Home Assistant 2024.11 minimum) Basic implementation for now |
 |
 |
Palazzetti plugin | 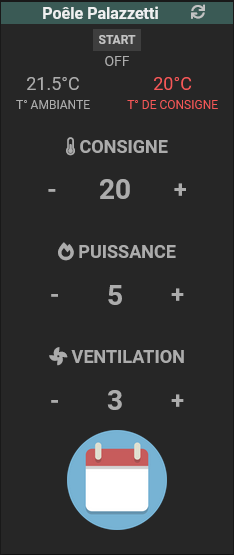 |

- 🛍️ Ready to use: I produce small batches, available here:

- 🔧 Build it yourself: schematic, PCB, box and firmware are described in BUILD
- ✅ If your stove has an accessible RJ12 connector, simply plug the cable in.
- 🔍 If not, you need an additional cable and a splitter: see Splitter Cabling.
If you bought your WPalaControl ready to use, the right cable is provided: simply use it.
Warning
If you built it yourself (or use another cable), use the correct cable for your hardware version (written on the PCB):
- Hardware V1.x: crossed cable
- Hardware V2.x: straight cable

On first boot, the module creates its own Wi-Fi network (AP mode):
| Firmware | SSID | Password |
|---|---|---|
| 3.2.0 and higher | WPalaControl |
password |
| 3.1.x and lower | WirelessPalaControlXXXX |
PasswordPalaControl |
You should be redirected to the module page automatically. If not, go to http://192.168.4.1.
Once the module is connected to your Wi-Fi network, it is reachable at 👉 http://wpalacontrol.local 👈
Note
The access point is only started when the module is not connected to your Wi-Fi network (first boot, wrong settings, network down).


- System: module serial number, firmware version, uptime, local time (NTP) and free memory. Logged crashes are listed if any
- WiFi: MAC address, Access Point status (and IP), Station status with connection state, IP, IP source (DHCP or Static IP), BSSID and signal strength (RSSI)
- WPalaControl:
- Hardware Version: detected (or forced) hardware version of the module
- Stove infos: the stove SN appears first, then all stove values are refreshed live every "Upload Period" (values that changed are shown in bold)
- Home Automation Status: protocol, MQTT connection state and result of the last publish

- NTP Timezone: your timezone, used for the module local time (default: Europe/Paris)
- Web Password: protects the web interface with a password (user:
admin). Leave empty to disable authentication (default). The password is never requested from devices connected to the module's own Wi-Fi network (AP mode). The HTTP API used by home automation systems stays reachable without password for compatibility reasons (see HTTP) - Reboot: restart the module
- Reset Configuration: erase all settings (System, WiFi, PalaControl) and restart the module with its default configuration (after a confirmation). The module then starts its own Wi-Fi network (AP mode, see First boot) and is reachable at http://192.168.4.1
- SSID & Password: credentials of your Wi-Fi network. Nearby networks are listed in the dropdown next to the SSID field (strongest signal first)
- Hostname: name of the module on the network
- Static IP: check to use a fixed IP configuration instead of DHCP
- IP, NetMask, Gateway, DNS 1 & 2: fixed IP configuration (IP is required)
Leave the SSID empty to keep the module in AP mode (reachable at http://192.168.4.1).

- Hardware detection: hardware version of the module
- Auto (default): version is detected automatically at boot
- V1.X / V2.X: force the hardware version if auto-detection fails
- Type: enable/disable MQTT communication
- Upload Period: refresh interval of stove information (15 to 300 seconds)
- Hostname, Port, Username, Password: MQTT broker details (username and password are optional)
- Base Topic: prefix of all WPalaControl topics
- MQTT Type: defines MQTT topics and data structure:
- Generic: raw values under the base topic (e.g.
{baseTopic}/T1=20.00) - Generic JSON: a JSON per category (e.g.
{baseTopic}/TMPS={"INFO":{"CMD":"GET TMPS","RSP":"OK"},...}) - Generic Categorized: raw values under a category topic (e.g.
{baseTopic}/TMPS/T1=20.00)
- Generic: raw values under the base topic (e.g.
- Home Assistant Discovery: enable/disable Home Assistant auto-discovery
- 0.2° SetPoint step: Set Point is adjusted in Home Assistant by 0.2°C steps (using
SET+STPF) instead of 1°C steps (usingSET+SETP). Only shown if Home Assistant Discovery is enabled and the stove supports it (air stoves)
- 0.2° SetPoint step: Set Point is adjusted in Home Assistant by 0.2°C steps (using

- Current Firmware: version installed on the module
- Online Update: latest release published on GitHub (version, title, date, summary and link)
- Refresh: check GitHub again for the latest release
- Update: download and install the latest release (enabled only if a newer version is available)
- Manual Update: upload a firmware file downloaded from the releases page
- Expected file name:
WPalaControl.x.y.z.bin - Older
WirelessPalaControl.*.binfiles are also accepted
- Expected file name:
Caution
Do not power off the module during the update. It reboots automatically when the update is done.
- ℹ️ Online Update requires Internet access from the module (not available in AP mode). If you configured a static IP, make sure Gateway and DNS are set (not needed with DHCP).
- 🏠 With MQTT and Home Assistant Discovery enabled, a firmware Update entity is also available in Home Assistant (checked once a day).
Commands are the same for HTTP and MQTT: see the Command list.
Send an HTTP GET request to the module:
http://wpalacontrol.local/cgi-bin/sendmsg.lua?cmd={command}
This API never requires the Web Password, so existing apps and plugins keep working when it is set.
Example: http://wpalacontrol.local/cgi-bin/sendmsg.lua?cmd=GET+TMPS returns:
{"INFO":{"CMD":"GET TMPS","RSP":"OK"},"DATA":{"T1":20.6,"T2":21,"T3":18,"T4":0,"T5":0},"SUCCESS":true}Once MQTT is configured, send commands to the {baseTopic}/cmd topic:
mosquitto_pub -h <broker> -t "WPalaControl/cmd" -m "SET+SETP+21"The result is:
- published following the configured MQTT Type
- published on
{baseTopic}/resultin JSON format
Other topics published by the module:
| Topic | Content |
|---|---|
{baseTopic}/connected |
0: not connected / 1: connected but no communication with the stove / 2: module and stove connected |
{baseTopic}/Core |
Module status in JSON (manufacturer, model, sn, version, uptime, localtime, freeheap), refreshed every "Upload Period" |
{baseTopic}/WiFi |
Wi-Fi status in JSON (apmode, stationmode, stationip, bssid, rssi, ...), refreshed every "Upload Period" |
{baseTopic}/App |
WPalaControl status in JSON (hwversion, hwdetection, MQTT status, last publish result, ...), refreshed every "Upload Period" |
{baseTopic}/update |
Latest available firmware update information |
{baseTopic}/update/install |
Command topic to trigger a firmware update (used by Home Assistant) |
⏲️: Published automatically every "Upload Period" (MQTT)
✨: WPalaControl specific command
| Command | Description | Values | Notes |
|---|---|---|---|
GET+STDT |
Get static data | ||
GET+ALLS |
Get all status data | ||
GET+STAT |
Get stove status | ⏲️ | |
GET+TMPS |
Get stove temperatures | ⏲️ | |
GET+FAND |
Get fan values | ⏲️ | |
GET+SETP |
Get current Set Point (desired temperature) | ⏲️ | |
GET+POWR |
Get current power | 1-5 | ⏲️ |
GET+CUNT |
Get counters | ||
GET+CNTR |
Get counters (same as GET+CUNT) |
⏲️ | |
GET+DPRS |
Get delta pressure data | ⏲️ | |
GET+TIME |
Get stove clock data | ⏲️ | |
GET+IOPT |
Get IO ports status | ||
GET+SERN |
Get stove Serial Number | ||
GET+MDVE |
Get stove model and firmware version | ||
GET+CHRD |
Get chrono data | ||
GET+PARM+92 |
Get parameter (e.g. 92 = pellet type) | parameter number | |
GET+HPAR+57 |
Get hidden parameter (e.g. 57 = % of pellet to feed for pellet type 3) | parameter number | |
BKP+PARM+CSV |
Get all parameters in a CSV file (HTTP only) | ✨ | |
BKP+PARM+JSON |
Get all parameters in a JSON file (HTTP only) | ✨ | |
BKP+HPAR+CSV |
Get all hidden parameters in a CSV file (HTTP only) | ✨ | |
BKP+HPAR+JSON |
Get all hidden parameters in a JSON file (HTTP only) | ✨ | |
CMD+ON |
Turn stove ON | ||
CMD+OFF |
Turn stove OFF | ||
SET+POWR+3 |
Set power | 1-5 | |
SET+PWRU |
Increase power by 1 unit | ||
SET+PWRD |
Decrease power by 1 unit | ||
SET+SETP+20 |
Set Set Point (desired temperature) | temperature | |
SET+STPF+19.8 |
Set Set Point with 0.2°C precision (depends on your stove model) | temperature | ✨ |
SET+STPU |
Increase Set Point by 1 unit | ||
SET+STPD |
Decrease Set Point by 1 unit | ||
SET+RFAN+7 |
Set Room Fan value | 0-5; 6=Max; 7=Auto | |
SET+FN2U |
Increase Room Fan by 1 unit | ||
SET+FN2D |
Decrease Room Fan by 1 unit | ||
SET+FN3L+0 |
Set Room Fan 3 value | 0-5 | |
SET+FN4L+0 |
Set Room Fan 4 value | 0-5 | |
SET+SLNT+0 |
Set Silent mode | 0-1 | |
SET+TIME+2023-12-28+19:42:00 |
Set stove date and time | year 2000-2099, month 1-12, day 1-31, hour 0-23, min 0-59, sec 0-59 | |
SET+CSST+0 |
Set Chrono status | 0-1 | |
SET+CSTH+2+18 |
Set Chrono Program start hour | prog 1-6, hour 0-23 | |
SET+CSTM+2+30 |
Set Chrono Program start minute | prog 1-6, min 0-59 | |
SET+CSPH+2+22 |
Set Chrono Program stop hour | prog 1-6, hour 0-23 | |
SET+CSPM+2+45 |
Set Chrono Program stop minute | prog 1-6, min 0-59 | |
SET+CSET+2+19 |
Set Chrono Program Set Point | prog 1-6, temperature | |
SET+CDAY+7+3+6 |
Set Chrono Program for a week day (Day-Mem-Prog) | day 1-7, mem 1-3, prog 1-6 | |
SET+CPRD+1+19+18+30+22+45 |
Set Chrono Program data (Prog-Temp-StartH-StartM-StopH-StopM) | prog 1-6, temperature, 0-23, 0-59, 0-23, 0-59 | |
SET+PARM+92+2 |
Set parameter 92 to value 2 (pellet type) | parameter number, value (e.g. 1-3 for 92) | |
SET+HPAR+57+95 |
Set hidden parameter 57 to value 95 (% of pellet to feed for pellet type 3) | parameter number, value |
Values published automatically every "Upload Period":
| Key | Meaning | Unit |
|---|---|---|
STATUS, LSTATUS, FSTATUS |
Stove status | |
T1, T2, T3, T4, T5 |
Stove temperatures | °C |
F1V, F2V, F2L, F2LF |
Fan values (meaning depends on your stove model) | |
F1RPM |
Fan 1 speed | rpm |
F3L, F4L |
Fan 3 / Fan 4 levels (if supported by the stove) | 0-5 |
F3S, F4S |
Fan 3 / Fan 4 values (if supported by the stove) | |
IGN |
Ignition counter | |
IGNERRORS |
Ignition error counter | |
POWERTIME |
Total heating time | hour:minute |
HEATTIME |
Unknown meaning | hour:minute |
SERVICETIME |
Heating time since last maintenance | hour:minute |
ONTIME |
Time since last power ON | hour:minute |
OVERTMPERRORS |
Overtemperature error counter | |
PQT |
Wood pellet consumption | kg |
STOVE_DATETIME |
Stove date and time | |
STOVE_WDAY |
Stove week day | |
SETP |
Current Set Point (desired temperature) | °C |
SECO |
ECO Mode restart temperature threshold (PAR50: 6 -> 0.6°C) | °C |
BECO |
ECO Mode active | |
PWR |
Current power | 1-5 |
FDR |
Feeder | |
DP_TARGET |
Delta pressure target | mPa |
DP_PRESS |
Actual delta pressure | mPa |
| Problem | What to check |
|---|---|
| Stove SN never appears on the Status page | Use the provided cable. If you built it yourself, check the cable type: crossed for hardware V1.x, straight for V2.x. Check also the Hardware detection setting |
wpalacontrol.local does not open |
Some devices (e.g. Android, some Windows setups) don't support mDNS: use the module IP address (shown in your router) |
| Wrong Wi-Fi settings, module unreachable | If it can't connect, the module starts its own access point: connect to it and go to http://192.168.4.1. You can also press the RST button 3 times to start in Recovery Mode |
| Web Password forgotten | Press the RST button 3 times to start in Recovery Mode: the password is not requested, so you can change it in Config → System |
| Online Update fails | The module needs Internet access. If you configured a static IP, make sure Gateway and DNS are set (not needed with DHCP) |
| Nothing published on MQTT | Status page → Home Automation Status shows the connection state and the last publish result |
Recovery Mode gives you access to the module when you can't reach it normally, without losing its configuration. Use it when:
- the module can't be reached after a Wi-Fi settings change (wrong SSID, password or static IP)
- you forgot the Web Password
Enter Recovery Mode:
- press the RST button (accessible on the side of the box) 3 times in a row, each press within 5 seconds of the previous one
- only presses of the RST button are counted: unplugging/replugging the module does not trigger Recovery Mode
In Recovery Mode:
- the module does not connect to your Wi-Fi network: it only starts its own (SSID and password in First boot). Connect to it and go to http://192.168.4.1
- the Web Password is not requested
- the stored configuration is loaded but not modified: nothing is erased
Leave Recovery Mode:
- save any configuration section (e.g. Config → WiFi or Config → System), after a confirmation: the module goes back to normal operation immediately (connection to your Wi-Fi network, Web Password if set). Reconnect your device to your Wi-Fi network and open the module address
- or reboot the module: it starts normally with its stored configuration